


Hopefully by now, everyone reading this has either upgraded their “classic” Google Analytics implementation to the current Universal Analytics from Google, or at least have decided to. If you haven’t decided to do that soon, read these reasons why it’s important to upgrade to Universal Analytics now rather than later.
If you followed my post for how to actually go about upgrading to Universal Analytics, that’s great. But that post dealt only with the changes to the code on your pages. It got you up and running with Universal Analytics, but didn’t take you through any steps on the Admin side to configure or fine-tune your Universal Analytics implementation. This post will take you through the final steps of your Universal Analytics setup. Basically, it shows you how to take full advantage of your new UA integration with best practices and recommendations.
And if you haven’t upgraded yet, these two posts can be used together to start and complete your conversion & configuration.
Getting Started
Most of the configuration settings we are going to fine-tune are in the “Tracking Info” section for the the Property you are looking at. So log into Google Analytics, and on the left-hand side, click on Admin at the very bottom. That will add three new columns to the right. The middle column is titled “Property“, and it’s here that you can configure the UA parameters for each property in that account. In that column, click on “Tracking Info” to expand it and look at the following properties.
Setting Timeouts for Sessions and Campaigns
By default, a session expires in Google Analytics after 30 minutes of inactivity. For most sites, this is fine and you would leave it as is. But if you have even some pages that have a lot of content, or videos that are pretty long, you might want to increase this setting. Remember, even if you have a 20 minute video, it’s very possible that people may need to pause it during playback to take a phone call or something. So a 20 minute video can easily keep a visitor on a page for over 30 minutes. You definitely don’t want to double-count many sessions.
Recommendation: This is tough to recommend without knowing more about your site and how your visitors use it. If you have some lengthy content, then increasing the timeout to an hour or even 90 minutes could be advisable. But in most cases, the 30 minute default will be fine.

To access the Timeout settings for Sessions and Campaigns, from the GA Admin panel, choose your Property, click on Tracking Info, and then Session Settings.
Campaign timeout has to do with traffic coming from links tagged with Google Campaign Tracking Parameters, or from AdWords ads. The default for this is six months. For example, if someone clicks on one of your AdWords ads, or a tagged link in an email to visit your site, and then on a different day just types in your url to get to your site, any conversions on that second visit will still be attributed to that most recent click from a campaign link, if that second visit occurred within six months (or whatever your timeout setting is).
Recommendation: You can change the Campaign timeout setting to be as little as 1 day, to as long as two years. In most cases, we just leave it at 6 months. If you run a lot of campaigns that have a limited window, like holiday specials, you might consider shortening this timeout just to make your reports a little cleaner.
Search Term Exclusion List
If someone comes to our website by searching in Google for websiteoptimizers.com, instead of just typing that url into the address bar of their browser, it will show up in Analytics as Organic Search traffic. In other words, Google Analytics will show that visitor as having come from a search engine. But should it really be? This gets to the issue of branded search traffic, vs. non-branded search traffic. If your SEO team is not differentiating this for you, they’re doing you a disservice.
Most companies don’t have to do much SEO for their own name. Hershey’s probably spends a good deal of money on SEO for terms like “chocolates”, “candy”, and “chocolate syrup”, and those are likely pretty competitive search terms. But they probably rank at or near the top for the term “Hershey” without much effort.
When looking at your organic search traffic, the inclusion of branded search terms (like “Hershey’s”, “Hershey”, or “Hershey.com” in the above example) really waters down the true results. Branded search traffic is not really a result of SEO efforts, and also indicates a much different objective from the visitor than non-branded search traffic. Branded search traffic is really much more similar to Direct traffic (just typing www.hersheys.com into the browser’s address bar).

Add your brand terms to the Search Term Exclusion list so that those searches don’t show up as Organic Search traffic. Direct is probably the proper bucket for these visits.
In Universal Analytics you can specify a list of search terms such that any traffic arriving to your site from search engines, searching for terms in your list, will be treated as Direct traffic rather than Organic Search traffic. This really cleans up your Referral information and makes it more accurate, from a marketing perspective at least.
To specify the list, go into the Admin section of Analytics and choose the Property you wish to configure. Click on Tracking Info, and then “Search Term Exclusion List”. From there, you can click the New Search Term button to add exclusions one at a time.
Don’t forget that if you do this, your Organic Search traffic will likely look much smaller in the first full month of this taking effect. That’s okay—you know that it’s because the branded search traffic is now excluded. Your numbers are much more accurate now.
Recommendation: We recommend that you do take advantage of this new feature and enter all variations of your brand(s) and any domains you have to exclude branded traffic from your search reports.
User-ID
The User-ID feature is a pretty cool aspect of Universal Analytics. It allows some sites to track visitors across different devices. For example, you could see how many people add a product to the cart from their phone, but save the actual checkout process for when they get back to their desktop. The catch is that you can only do this if your site allows people to log in with a username and (optionally) password. And of course, you could only get that information for people who actually do log in from each device. But even for just a subset of your traffic, this can be valuable information.
It’s a little more complicated to set up the Universal Analytics User-ID tracking, but as I said, it’s worth it. To start, you have to add a little bit of Analytics code to your site. If everyone is directed to the same landing page once they’ve successfully logged into your site, then it’s simple to just add a line of code to your Analytics snippet right there. Simply add a line between the last two lines of your standard UA snippet, such that the final three lines now look something like:
ga(‘create’, ‘UA-1234567-1’,’auto’);
ga(‘set’, ‘&uid’, ‘User6789’);
ga(‘send’, ‘pageview’);
In the Google Analytics code example above, the middle line is the new one, and the “User6789” would be replaced with whatever userid comes from your system. Note that it must be unique, and for privacy reasons it is not allowed to be something identifiable to an actual person, such as their email address.
If users might be directed to one of many different pages when they log in, it might be better to fire a Google Analytics Event when they log in. This would be done by executing these two lines of code:
ga(‘set’, ‘&uid’, ‘User6789’);
ga('send', 'event', 'user-activity', 'user-login');
Again here, “User6789” would be replaced with your actual userid, and in the second line, the values of ‘user-activity’ and ‘user-login’ could be left as they are, or changed to something more descriptive if you want.
Let me remind you again: the value you pass for &uid must NOT be something that is immediately identifiable to a person. So do NOT pass in their email address for that, even if they use their email address to log in. In that case, pass in some unique record id from your database table of users.
Once you have the code installed in the proper areas of your site, you then need to go into Universal Analytics and create a new User-ID View in your property. To do this, go into the Admin section of UA and choose your Property. Click on Tracking Info, and then click “User-ID”. Review the User-ID Policy and turn On the switch to agree to it, and then click Next Step.

Once you have the extra line of JavaScript on the relevant page(s), go into “User-ID” under “Tracking Info” in the Property section of the admin panel and turn on the User-ID feature. You’ll also likely want to keep the Session Unification setting turned ON.
Step 2 gives you the code we discussed above, which you don’t have to worry about since you’ve taken care of that already! However, it also allows you to keep on, or turn off Session Unification. We recommend you keep it turned On. Click Next Step.
Step 3 just asks for your confirmation. Click the Create button to complete the process of setting up the new View.
Now when you pull up this new View in your Reporting, you’ll have access to new reports to give you information on things such as cross-device activity, User-ID Coverage, User Engagement, etc.
Recommendation: If your site does allow users the option to create an account and log in, you should set up User-ID tracking and create a separate view for that. The ways to use the data collected will only grow.
Enhanced Ecommerce
I covered adding Ecommerce Tracking for Universal Analytics in the earlier post on upgrading to UA. But one of the newer features added to Universal Analytics is Enhanced Ecommerce, which can give Ecommerce sites so much more information. In addition to the standard Ecommerce reports we see saying how many orders have been placed and what products have been ordered, etc., Enhanced Ecommerce can give you information on products being added to the cart, what pages they were added from, cart abandonment, and much much more.
However, Enhanced Ecommerce setup requires a post all its own, so that will be coming up in the near future.
Recommendation: If your site is an Ecommerce site, you can get away with not setting up Enhanced Ecommerce at this time (provided you do have basic “standard” Ecommerce tracking in place). But do put together a plan for adding this capability to your site soon.
Other Things You Could Fine-Tune, But Probably Don’t Need To
There are a few other areas of fine-tuning available in Universal Analytics, explained below. However, in most cases, you won’t have any reason to change them from the default setup.
Organic Search Sources
There are currently 40 different search engines that Google rolls up into its Organic Search report. (You can find that full list here.) Traffic coming from any other search engine will show up as Referral traffic from that source. If you are for some reason getting a lot of referrals from a search engine not on that list, such as Lycos, and want those to be included as Organic Search traffic, you could add Lycos as a Search Source for your Analytics implementation.
Do this by selecting the correct Property in your Analytics Admin section, clicking on Tracking Info, and then on “Organic Search Sources”. Click the “Add Search Engine” button and fill in the information, with the Domain Name and Query Parameter fields being required.
If you’re not sure what to enter for Domain Name and Query Parameter, it’s easy to find out. Go to the search engine you’re adding and search on something–anything! We’ll continue with our example of Lycos, and search for “Cheese”. Now look at the url of the search results page.
Of course, spotting the domain is straightforward. But notice it’s not always the domain you perhaps expected. For Lycos, the domain is not Lycos.com, but search.lycos.com.
To find the Query Parameter, look in the url for the word(s) you actually searched for (in this example, “cheese”). Just to the left of it should be an equals sign, and to the left of that, will be either a question mark or an ampersand, followed by a variable name. In this example, the whole thing is ?q=cheese. The Query Parameter is the variable name, in this case, “q”. Enter that into the Query Parameter box in Universal Analytics.
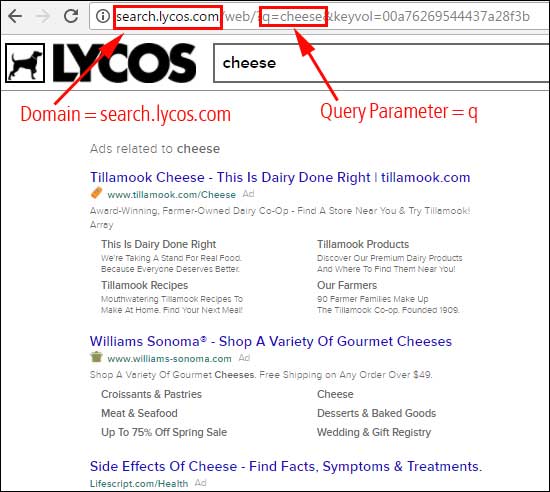
To find the correct Domain Name and Query Parameter to add a new search engine into your UA implementation, search on something (like “Cheese”). The domain is of course the first part of the resulting url. Look for your search term in the same url (cheese), and the search parameter is the variable to the left, between the equals sign and the question mark (or sometimes ampersand).
Recommendation: If you do consistently see a lot of referrals from a particular search engine in your Referrals report, it can be a good idea to add that search engine as a Search Source. One reason is that this can give you additional search term data that you’re not getting due to Google’s [Not Provided] issue.
Referral Exclusion List
If for some reason you have referring sources that you don’t want showing up in the Referrals report, you can add those domains here. What this means is that traffic coming from those sources will not be counted as a new session. Note that Universal Analytics automatically excludes the domain associated with the property from referrals, so there’s no point to using this to exclude self-referrals. But if you do use things such as third-party shopping carts with their own domain, some people use this tool to exclude traffic coming back to their original site as a new session. However, a better method is to use proper cross-domain tracking principles to prevent this.
Take Full Advantage of the Universal Analytics Feature Set
So there you have it—the final steps to setting up and tuning your Universal Analytics implementation. For some of you, the default setup of these features will suit you just fine, but most sites are better off changing at least some of these settings for an optimal setup. Take the time now to go through your setup and make the tweaks that give you the best picture of your metrics possible, given the needs and objectives of your website.
And please, leave comments below with questions, or additional inputs you might have to any of this!