 Have you upgraded to Google’s Universal Analytics yet? As I mentioned in my previous post, everyone using the “classic” version of Google Analytics will eventually have to upgrade to Universal, and it’s smart to go ahead and do that sooner rather than later. For one thing, there are more features in UA (and more will likely continue to be added).
For another thing, upgrading is actually quite easy. We recently completed getting all of our clients transitioned to Universal Analytics. They ranged from some very basic implementations to some sophisticated Google Analytics implementations with ecommerce and lots of events. All went smoothly and most took less than a half-hour’s worth of work.
So let’s get started. Here is your one-stop tutorial for upgrading your site to Universal Analytics (UA).
Step 1: Make Sure Your Account Is Transitioned
Back when UA was first rolled out of beta, accounts still had to go in and initiate an Upgrade to the Universal Analytics platform. This was by then a fairly simple process, but that was back in April of 2014. And at that time, Google said that it would start migrating accounts over to the new platform automatically over time. That is okay, because your account can be migrated to the UA platform but still be running the old “classic” code (but you can’t take advantage of any of the advanced features UA has to offer). Think of this state as being “UA-ready”.
Google now claims that they have migrated 100% of the accounts, so it is extremely unlikely that yours has not been migrated. Still, it makes sense to just go into your account and quickly verify that it has indeed been transitioned.
Check To See If You Have Been Transitioned
It’s easy to tell whether or not you have been transitioned. This is all done at the Property level within Google Analytics. So go to the Admin tab of your GA Account and select your Property. In that Property column, there will be a choice titled “Tracking Info” or “Tracking Code”. Generally speaking, if it says “Tracking Code” you are still on the Classic platform, and if it says “Tracking Info”, this property has already been transferred to the Universal Analytics platform (but again, this does not mean you are already actually using it!).
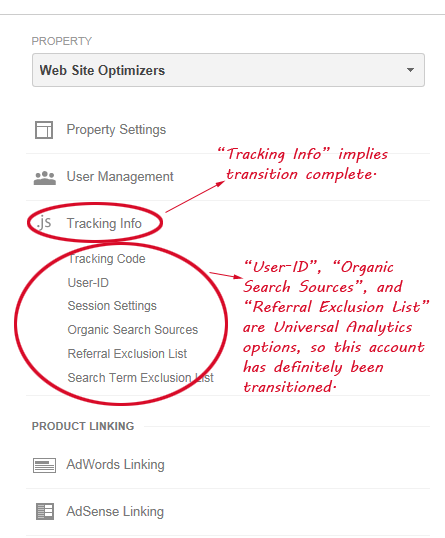
By pulling up the Tracking Info for a Property, you can tell for certain whether or not the Property has transitioned to the Universal Analytics platform.
However, there have been reported cases of properties that say “Tracking Info” that are not actually transitioned yet, so just to be sure, let’s double-check. Regardless of whether it says “Tracking Info” or “Tracking Code”, click that link and look at the sub-choices that appear below it. If you see choices like “User-ID”, “Organic Search Sources”, and “Referral Exclusion List”, you have been transitioned.
As I say, you have almost certainly already been transitioned. But if you have not, you need to request a transfer. In that Property column, if you are on the Classic version you’ll see a choice called “Universal Analytics Upgrade”. Click that. And in the section titled “Transfer to Universal Analytics”, click “Transfer”. Read the resulting pop-up and assuming you are ready, click the “Upgrade” button. Then you just need to wait for Google to complete your transition process (about 24 to 48 hours, according to Google).
Step 2: Update The Analytics Code On Your Site
In most cases, this will be quite simple. Each page of your site has traditional GA tracking code on it that must be updated. In most cases, this code exists in just one file that is “included” in every page of your website. If you’re not quite sure what to look for, search your code for your Google Analytics Account number (typically begins with UA-, but you can also find it in the Admin section of Google Analytics under your Property). The old “classic” code that you’ll be replacing should have a bunch of lines that mostly begin with “_gaq”.
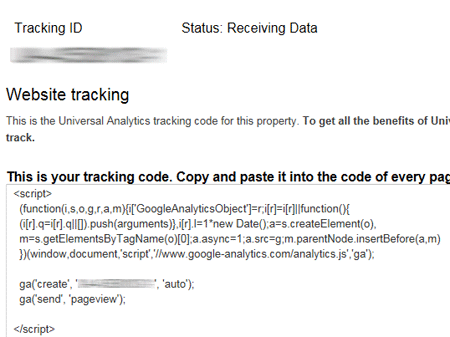
When you’ve found the old code replace it with the new. To get the new code, go to the Admin tab of Google Analytics and select the correct Property. From there, click on “Tracking Info”, and below that, “Tracking Code”. This will give you a window with the correct tracking code to use for Universal Analytics. Replace your old code with this and push it to your server.
That was pretty easy, right? But we’re not quite through with this step. It can take several hours before Google starts showing you Analytics data in the reports, but you can mosey on over to the Real Time reports to make sure you’re receiving data with your new code. Pull up another browser window and visit your site. Do a View Source Code to make sure you see the new UA code, and then switch over to the Real-Time Overview report to see if your visit is showing up. If it is, you’ve updated your basic code successfully!
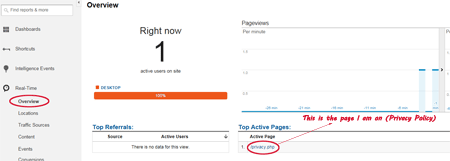
You can verify that your new code is working by navigating to a rarely viewed page on the site and seeing that your page view is being recorded in the Real-Time reports. Here, I navigated to the Privacy Policy page late at night and saw that the new code was working fine. (Click to view larger.)
Step 3: Handle Special Situations
In many cases, you’ll be finished after Step 2. However, there are situations where you may have additional Google Analytics code in your website. If you’re using things like Ecommerce, Events Tracking, or Custom Variables, you have additional Analytics code on your site that needs to be updated as well.
Events Tracking
If you do any Event Tracking in your GA implementation, you’ll need to update the code used to fire these events on your site. The syntax is different in Universal Analytics.
How do you know if you’re using Events Tracking? One way is to open up the Reporting tab for your site, and open up the “Behavior” section in the left hand side navigation. In that section, click on “Events” and then on “Overview”. Set a wide date range, say about the past two months. If you see 0 Total Events, you most likely do not have any User Events GA code on your site. But if you do see data, then you need to locate all of your Events Tracking code and update it to the new syntax.
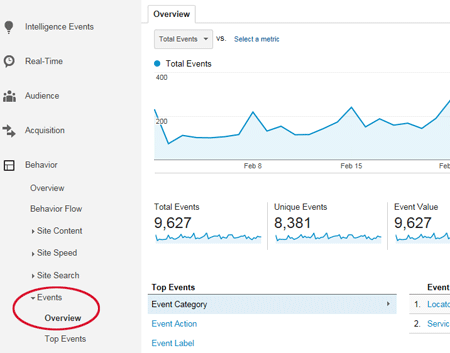
The Google Analytics Events Overview report. If you see data here, you’re obviously using Event Tracking and must update the code to upgrade to Universal Analytics (click to view larger).
The basic syntax for Event code in the old GA implementation was:
_gaq.push(['_trackEvent','Category','Action','Label',Value,Non-Interaction]);
(For more information about each of those parameters and Analytics Events in general, see my earlier post on Events Tracking in Google Analytics.)
In Universal Analytics, you pass the same parameters. The syntax is just different. In UA, that syntax is:
ga('send', 'Event', 'Category', 'Action', 'Label', Value, {'nonInteraction': 1});
Probably the most difficult thing will be to identify all the locations in your code where Event code is being used. If you can’t go to your development team to change this out, the best thing to do is to search for the old code against your complete existing code base. We use an excellent tool for a task like that called Aba Search & Replace. Simply search for instances of “_trackEvent”. For any line you find that is actually doing some Event Tracking, change the syntax to match the new UA version above.
Ecommerce Tracking
If your site is taking advantage of Ecommerce Tracking (and if it is an Ecommerce site, I certainly hope you are), then there is some additional code being used for that as well. It’s simple to confirm whether or not your site is set up for Ecommerce Tracking. In the “Conversions” section on the left, click on “Ecommerce” and then “Overview”. If your site is set up with Ecommerce code, you should see a report with data. If it is not, you will see a message saying that the site is not set up for ecommerce tracking.
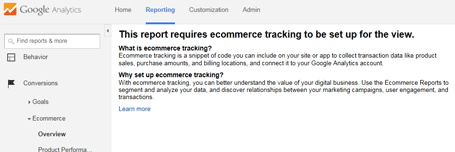
If you see this message instead of data on the Ecommerce Overview report, this Google Analytics View is not set up for Ecommerce Tracking. If there is instead data showing up, you will have to update your code to upgrade to Universal Analytics (click to view larger).
The Ecommerce Tracking code (regardless of platform) is more complicated than for Events Tracking. There are three sections to the Ecommerce Tracking code in classic GA: the addTransaction section, multiple addItem sections (one for each item bought), and the trackTrans section.
The new UA version has these same sections, but before you do anything with them, there is a new step in UA. You must first load the ecommerce plugin. So anywhere after your basic Universal Analytics code for the page, add the line:
ga('require', 'ecommerce');
For the addTransaction section, the old code looked something like this:
_gaq.push(['_addTrans','TransID','Storename','TotalOrderAmt','Tax','Shipping','City','State','Country']);
So a real example might be something like:
_gaq.push(['add_Trans','C3245-29','Web Store','66.31','5.05','5.25','Dallas','TX','USA']);
In Universal Analytics, the syntax is:
ga('ecommerce:addTransaction',{'id': 'TransID','affiliation': 'Storename','revenue': 'TotalOrderAmt','shipping': 'Shipping','tax':'Tax'});
So the same real example would look like:
ga('ecommerce:addTransaction',{'id': 'C3245-29','affiliation': 'Web Site','revenue': '66.31','shipping': '5.25','tax': '5.05'});
For the addItem section, the old syntax was:
_gaq.push(['_addItem','TransID','SKU','ProductName','Variation','UnitPrice','Qty']);
For Universal Analytics, the syntax for this section is:
ga('ecommerce:addItem', {'id': 'TransID', 'name': 'ProductName', 'sku': 'SKU', 'category': 'Variation', 'price': 'UnitPrice', 'quantity': 'Qty'});
Finally, in the old version of GA, you would have the following line to send the transaction to GA:
_gaq.push(['_trackTrans']);
In Universal Analytics, that line becomes:
ga('ecommerce:send');
You could use a tool like Aba Search & Replace to look for the code to replace in your code base, but in all likelihood it should be on the Order Confirmation page for your shopping system.
Custom Variables
In classic Google Analytics, you used the code on your page to set up Custom Variables and send the data to GA. In Universal Analytics (where they are now called Custom Dimensions and Custom Metrics), you set them up from the Admin tab and send the data via your code, but of course with a different syntax.
So for example, if you had old GA code to set a custom variable with the gender of the user, it might look something like:
_gaq.push(['_setCustomVar',1,'Gender','Male',1]);
So to set this up as a Custom Dimension in Universal Analytics, go into the Admin Tab of your GA account and choose the appropriate Property. In that Property area, select the Custom Definitions section. Click on “Custom Definitions”, and then “Custom Dimensions” and then click the “+New Custom Dimension” button. Here, you would enter “Gender” for the Name, and select “User” for the Scope and click “Create”. On the resulting screen, you’d see what index this Dimension has been assigned (let’s assume it is assigned slot #2).
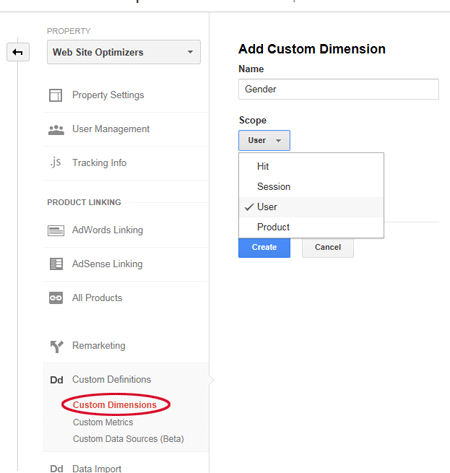
Add Custom Dimensions and Custom Metrics in Universal Analytics via the Admin tab in the Property section (click to view larger).
Then in your code, you’d use the new syntax:
ga('set', 'dimension2', 'Male');
Conclusion
So this may look like a long and technical post, but for the majority of you, you’ll be stopping after Step 2, in which case it is an extremely simple process! So go on and start planning out your process to upgrade your site soon to take advantage of the benefits of Universal Analytics.
Next Time: I’ll cover the fine-tuning of Universal Analytics to take advantage of its most useful features.




Pingback: Why You Should Upgrade To Universal Analytics Now - Tom Bowen's Blog - Web Site Optimizers()
Pingback: This Should Be Your Site’s Top New Year’s Resolution - Tom Bowen's Blog - Web Site Optimizers()