


I think it might be the most under-utilized facet of Google Analytics—Events Tracking. While Customer Segments is the most powerful component of GA in terms of analyzing data, I feel that Event Tracking is the most powerful component in terms of collecting data. And it is certainly one that is not taken advantage of nearly as often as it should be.
In almost every Google Analytics Audit we do, and we do a lot, we come across things that are not being tracked, but should be, and Events Tracking is almost always the vehicle to do it.
Events Tracking? Just What Is That?
Google Analytics is by default, a “page views”-based system. That is, it is based around firing a piece of JavaScript each time a new page is loaded, sending data about that page view to GA. With no further configuration, that’s pretty much all it does, meaning that the data it collects is just about pages viewed and the characteristics of the user viewing them.
That was (sort of) fine when GA was first introduced. Most websites offered very little for users to interact with, other than to just view the page. But over the past two decades, websites have evolved to the degree that all kinds of things happen on a page that do not result in a new page view.
Users do things such as click links that direct them to other websites, download files, fill out forms (completely or partially), watch videos, interact with photo slideshows, participate in online chats with you, interact with widgets, and more.
The site itself might do things such as display a lightbox, show dynamic content, intelligently display help text after a certain amount of inactivity, automatically log people out, and other things that are not triggered by the user taking an action.
Typically, none of those things result in a new page being loaded. Therefore, none of them would be recorded by an out-of-the-box implementation of Google Analytics.
But Google Analytics has a feature known as Event Tracking that allows you to record when things like this that you identify happen on your website. You do this by running a piece of JavaScript code when any of these events happen.
For example, if you want to know how many times a visitor clicks on a particular link, you can attach some JavaScript code to track that link, and then pull up very helpful reports in Google Analytics to give you the results.

Click for larger view
Can’t I Just Use the Site Content Report for That?
You can use the Site Content report to see how many times a particular page was viewed. But you probably have several different links to that page on your site (not to mention from Google and other outside sites). If you wanted to track the number of times just one specific link was used to get to that page, such as a link from your Home page, you could use Event Tracking to do that.
Also, sometimes a link on your site points to something you can’t attach normal GA tracking to, such as a PDF file. You would not be able to use the Site Content report to track the number of times a PDF on your site was viewed. But you could by setting up Events Tracking on all of the links pointing to the PDF.
There are lots of other great uses for Event Tracking. And in my next post, I’ll describe some of them. But first, let’s give a brief summary of how to implement Events Tracking.
How Do I Set Up Event Tracking?
It might sound technical, but it’s really not. Events Tracking is pretty simple to set up, and does not take any special configuration within Google Analytics. You don’t even have to have access to Administrative accounts in GA. The only prerequisite is that you have the normal Google Analytics snippet installed on the pages you want to add Event Tracking to (which should already be on all pages of your site).
I hope the mere mention of “JavaScript” didn’t turn you off! This is very simple, and anyone can explain to their developer what needs to be added. It just takes one line of code to be added, after you determine a few values you’ll be using in your reporting.
And if you can’t go to your developer to add the JavaScript code, worry not. You can also use Google Tag Manager to fire the Event (assuming you have GTM installed on every page). I’ll go over both methods in this post.
The Events Tracking Variables
Each Event you track comes with five different variables you set to help you track and group different sets of events, which are described below. Since I’ve started talking about downloading PDFs, let’s use an example where you have a Support Library on your site with various PDF files (Getting Started Guide, Technical Reference, Trouble Shooting Guide, etc.). You want to track how often each file is downloaded.
Category (required)
Think of this as an overall grouping of similar events. Or as I like to say, “What is being acted upon.” So in our example, it could be “Support Library”. Each of the different documents in your Support Library would have this as their category. But if you had other documents available for download in different sections of your site, a Price List for example, those might have Category values more relevant to the type of document they are (perhaps “Sales Collateral” for the Price List example).
Action (required)
This gets more to what is actually being done, or what actually happened. In our example, the user is downloading a PDF, so it could be “Downloaded” (I like to name my Actions in the past tense). If there are other sections of downloads on your site, you could easily monitor the total number of downloads across all categories this way.
Label (optional)
We get a little more specific here. I like to think of the Label as answering the question, “Which one?” If the Category is an overall group of things, Label is the individual item in that group. So in this example, one could be “Getting Started Guide” and another could be “Technical Reference”.
So those first three go together to describe pretty closely what actually happened. They can be combined to for a kind of a sentence. “Our Support Library had the Getting Started Guide Downloaded.” Or, “One of our Videos with the name Company Promo was Watched.” (Category, Action, Label)
Value (optional)
It’s helpful that Google allows us to set a value to an event. In some cases you may not choose to set a value, but if for example you have a Price List available for download somewhere, that might be of greater value than a Support Document because the downloading of a Price List might indicate a qualified prospect. The Value parameter must be a number. It could represent a financial amount, but does not have to. Let’s say we’ve decided that a download of the Getting Started Guide is worth a value of 50, which if nothing else would be relative to other values we set for other events.
Non-Interaction (optional)
This is a True/False variable that indicates whether or not this event will affect GA’s Bounce Rate calculation. If you set it to True, it will not change the Bounce Rate calculation. If you set it to False, the triggering of the event will generally ensure that the visitor does not get counted as a “Bounce” even if this is the only page they view.
Confusing? I know! Remember, Google Analytics defines a Bounce as any session where the user viewed exactly one page. They came and looked (or didn’t look) at one page, and left. (For more on Bounce Rates, see this post.) So let’s say they came straight to this page from a Google search, and did nothing and left. Okay, that’s a Bounce. But suppose they came straight to this page, but from there downloaded a PDF file on that page, and then left. Google will still call that a Bounce, since the only thing recorded was the one page view. But if you fire an Event with that download (and the non-Interaction flag is at it’s default setting of False), this session will no longer be counted as a Bounce, which is good, because the user did interact with the site during the session.
Suppose, however, that you have every page set up to display a popup after 10 seconds asking if the user wants to sign up for your newsletter. And maybe you want to fire an Event every time that happens. Here, you’d want to set that non-Interaction flag to True. Because just because the user was there long enough for the signup form to pop up, there is still no indication that they interacted with the page. So that Event should not affect the Bounce Rate calculation.
So What Is The Code?
The actual snippet of JavaScript code to fire an event looks like this:
ga('send','event', 'Category','Action','Label',Value,{'nonInteraction': 0/1});
So in our example of downloading the Getting Started Guide, that might look like:
ga('send','event','Support Library','Downloaded','Getting Started Guide',50,{'nonInteraction': 0});
In our example, the Event is assigned to a particular link. Suppose that before adding Event Tracking, the link looks like:
<a href="get-started.pdf">Getting Started Guide</a>
To fire the event, we would use the onClick event. That would make the new line:
<a onclick="ga('send','event', 'Support Library', 'Downloaded', 'Getting Started Guide',50);" href="get-started.pdf">Getting Started Guide</a>
(Note that this time, I left the {‘nonInteraction’:0} portion out, since it defaults to this. You only need to include it if you’re setting the flat to True.)
Of course, the event doesn’t have to be triggered by a link, but more on that in the next post. In the meantime, know that anywhere you can insert some JavaScript code, you can fire the Events Tracking line of code.
Using Google Tag Manager
Once you start using Events Tracking, you might get addicted. You’ll think of all kinds of things you want to start tracking this way. And you’ll tire of asking your developer over and over to add more JavaScript to track more events. Fortunately, Google Tag Manager (GTM) can enable you to set up Event Tracking for most of the things you’ll want to track. (The rest of this section assumes you have GTM installed on every page of your site, and that you are already logged into GTM.)
GTM Trigger
To send Events Tracking information to Google Analytics using Tag Manager, you generally have to set up a Trigger and a Tag. Now the Trigger is going to vary based on what event you are actually trying to track. If you’re tracking things based on a Click, such as the downloading of the PDF file in our example, you would set up a Click trigger.
In the example of downloading the Getting Started Guide pdf, the user would click a link to do that, so you’d create a “Click – Just Links” trigger, and specify the url of the page that the link appears on. Finally, specify some links, with the Click URL of the pdf being downloaded.
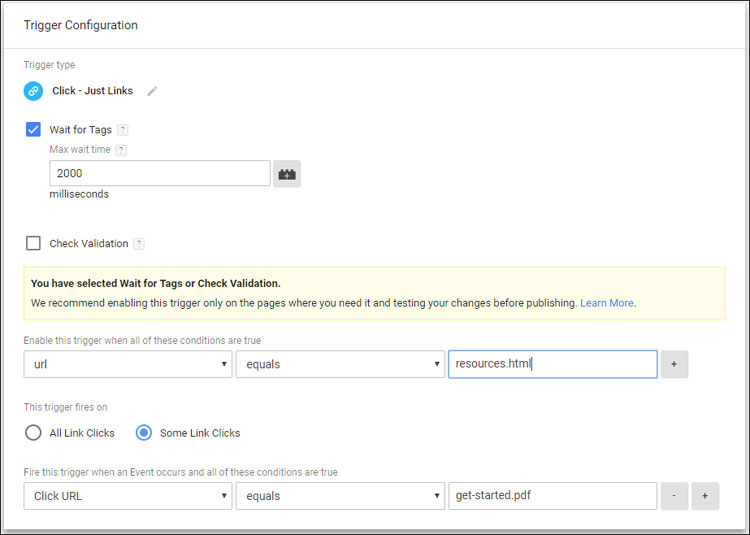
To trigger an Event when a specific PDF is clicked for download, create a “Click – Just Links” trigger and specify the url of the page the PDF link appears on, and the URL of the PDF itself.
If you have a lot of different files available for download, you might find it wiser to create one trigger that fires for any file download. The fabulous GTM expert Simo Ahava wrote a great post on the best way to do that.
GTM Tag
While different event require different Trigger configurations in GTM, the Event Tag is handled pretty much the same in all instances. Each event will need its own tag, but creating them is pretty straightforward.
Create a Universal Analytics tag and choose “Event” for the Track Type. Doing so opens up boxes for you to specify your Category, Action, Label, Value, and Non-Interaction values. You also need to provide your Google Analytics Account ID (which we always set up a global variable for).
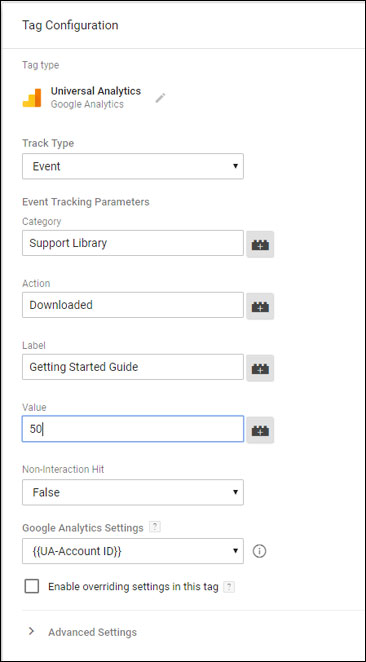
The Tags for your Events are all done the same way. Choose a Universal Analytics tag type, and choose Event for the Type. Then enter the values you wish to use for the Category, Action, Label, Value, and Non-Interaction flag. Finally, provide your UA Tracking ID.
Once you’ve set all that up, just specify the Trigger you created in the first step above, and you’re good to go Publish!
Testing Your Code
With GA’s Real-Time Reports, you can easily implement Event Tracking code on your site or through Tag Manager and immediately test whether or not it is working correctly. Here’s how.
Update your page(s) with the Events Tracking code or Publish your triggers & tags in Tag Manager and call up the page in your browser. In another tab, call up Google Analytics for that website and click on Real-Time in the left hand navigation and then Events in the sub-menu that opens up. Assuming you had no Event Tracking elsewhere on the site, you should have a page that is essentially blank—just a flat-line graph.
Now go back to the tab with your website open in it and click on the link that you think should fire the event tracking and then go back to your Analytics tab. If the code was written correctly, within seconds you should see the event showing up on the screen. The graph will show the one event, and in the bottom half of the page, you should see the Category & Action that were assigned to that event. If you click on the actual Category, you should see the Label that you assigned.
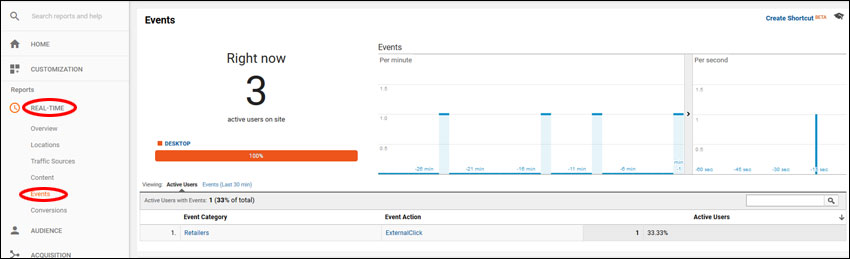
To test that your Events are registering correctly, open up the Real Time section of Google Analytics and click on Events. Then in a different tab or window, go perform an action that should fire an Event. Come back to the Analytics tab and you should quickly see that Event showing up in this report.
Viewing Your Events
Once you have Events Tracking properly set up on your site, and you have waited a day or two to ensure that real events are taking place, it’s time to start viewing the results!
In Google Analytics for the site you are measuring, open up the Behavior menu and click on Events. To me, the most valuable report here is the Top Events report. Here you can see the total number and value of events by Category, Action, or Label, and drill down for any of them.

To see the recorded Events in Analytics, go to the Behavior section and click on the Events link, then click on the Top Events report. You can choose Category, Action, or Label as the Primary Dimension and then drill down on any of the items in the report.
Also, if you have identical events spread out over different pages, you can use the Pages report to see which pages the Events are coming from.
And of course, you can use Advanced Segments in viewing these reports just as you would from any other report. But here is the really cool part regarding Advanced Segments. You can now create Segments based on your new Event Tracking! So if you want to analyze the behavior of just the people who download your Getting Started Guide, you can create an Advanced Segment for that.

Create Advanced Segments for people who complete a specific event, such as downloading a specific document (click for larger version).
It’s Not Working For Me – What Am I Doing Wrong?
If you see your events in the Real-Time reports, but not in the standard reporting, keep in mind that it can take several hours for events to show up there. If you’re not even seeing your Events in the Real-Time reports, and you’ve gone through your code and think that it looks right, the first tool I go to is the Developers Console built in to Chrome or Firefox (ctrl-shift-I should pull this up in either browser, then click the Console tab). This will show you any JavaScript errors on your page as they are encountered. So for example you might have a syntax error in some other piece of code that is run before the Event is fired that stops it from being run. The Error Console will point that out.
If you are seeing no JavaScript errors, then the next best tool I’ve found is the Google Analytics Tracking Debugger for Chrome. That can show you more details of what is happening as the code is being executed.
Happy Tracking
If you’re new to Events Tracking, I encourage you to start thinking of ways it can be useful to you and then go and implement! If you’ve been using Event Tracking, please let us know what your favorite ways of using it are in the comments below. In my next post, I’ll continue the discussion with some valuable uses for Google Analytics Events Tracking.


Pingback: 8 Fabulous Uses of Google Analytics Events Tracking To Better Understand Your Customers | Tom Bowen's Blog - Web Site OptimizersTom Bowen's Blog – Web Site Optimizers()