


 There’s a lot of talk these days about speeding up the response time of your website, and rightfully so. I’ve written about it before myself, because it’s a very important contributor to good conversion. But with the explosion of mobile traffic, and the fact that mobile users are often operating on much smaller bandwidth than desktop, the issue has become even more critical.
Just how critical? You may have already read about any of the many studies that have shown how improving page load times resulted in conversion rate improvements. But to bring things into the mobile world, consider these statistics presented by Simon Bolger of Google at 2016 PubCon in Austin, Texas, based on a study of mobile users Google conducted:
• Three out of every four mobile users will abandon a site that takes over 5 seconds to load.
• 33% say that site speed is the most important factor when using a mobile site.
• 88% of mobile users are less likely to come back to a site with a poor mobile experience.

Simon Bolger at PubCon, Austin, 2016. Photo credit: Paul Fach
Think about those facts for a moment. For one out of every three mobile users, speed was the most important factor when using a mobile site. Not just an “important” factor, but the most important. More important than shipping time. More important than the ability to find a product. More important than the ease of navigation. That’s a big statement!
And that last one? Eight out of every nine users will not come back to a site with a poor mobile experience. And speed is clearly one of the biggest factors in that mobile experience.
So yes, now more than ever, the speed of your site is a really big deal.
Improving Page Speed For Your Mobile Users
Okay, when it comes to the speeding up your website, most of us think that is a big technical thing that should be reserved for our developers. We know it’s important, but we think it’s beyond us. We don’t control the code of our site, or the server, or anything else on the technical side.
But when so much hinges on the speed of your site, it is immensely important that you do care about it. And the good news is that you can improve some things yourself, without having to get into any of the technical aspects of things. One area where you don’t need a lot of technical expertise is to look at the larger images on your page.
Reduce Image Sizes Without Sacrificing Quality
We’ve talked before about how bloated images often make up the lowest hanging fruit for improving load times. Follow the steps in the link above to use WebPageTest.org to identify the largest images on your page.
Now many articles will talk to you about using PhotoShop or other similar tools to “optimize” your images for the web. I’ve talked about doing that myself in different posts & presentations. In my experience, you can often reduce file sizes by 50% or more without much noticeable change in quality (to me at least!).
However, many people do fret about a loss of quality as you try to compress a file size further and further (Art Directors, you hear me, don’t you?). So there’s actually an alternative method out there for reducing file sizes without sacrificing the quality. In fact, the smaller-sized files often look even better than the original ones. It’s true!
The Daan Jobsis Method for Image Size Reduction
A few years ago, Dutch designer Daan Jobsis wrote a fascinating blog post about a different method of reducing the file size of an image. Jobsis showed several examples where instead of reducing an original image to the physical size you’ll use on your page and then saving at a standard compression level, he reduced the image so that it was actually twice as big as he’d need, and then save it at full compression (Quality=0 in PhotoShop). He then had the browser scale the image down to the proper display size.
The results were that typically, the file size of the larger, but more compressed image was about half that of the version saved the more typical way. But you can’t see much difference on the screen. If anything, it looks even better!
Smaller File Size & Better Quality? It’s True!
I know that sounds either confusing or a bit too good to be true. But let me take you through an example. You’ll see how easy it is!
It starts with knowing how much space you’ve allotted on your page for a given image. On this particular blog, my photos are generally 850 pixels wide. So to utilize this method, you must have an original source image at least twice the size you want to display. So in my case, that means I need to start with an image at least 1700 pixels wide.
So for this example, let’s use a picture of a Lamborghini that I found on Pixabay. The original file I downloaded had dimensions of 1920 x 1126. Now traditionally, to use it on your website, you might open it up in Photoshop, size it down to 850 x 498, then Save For Web & Devices with a quality level of around 70, and then upload that onto your website.

Traditionally, to display an image at 850 wide, you’d resize to that width in Photoshop and “Save for Web & Devices” at Quality of 70.
I did that very thing, and here is the result. The exact file size, according to Webpagetest.org is 69.9Kb. As you can see, it looks pretty good!
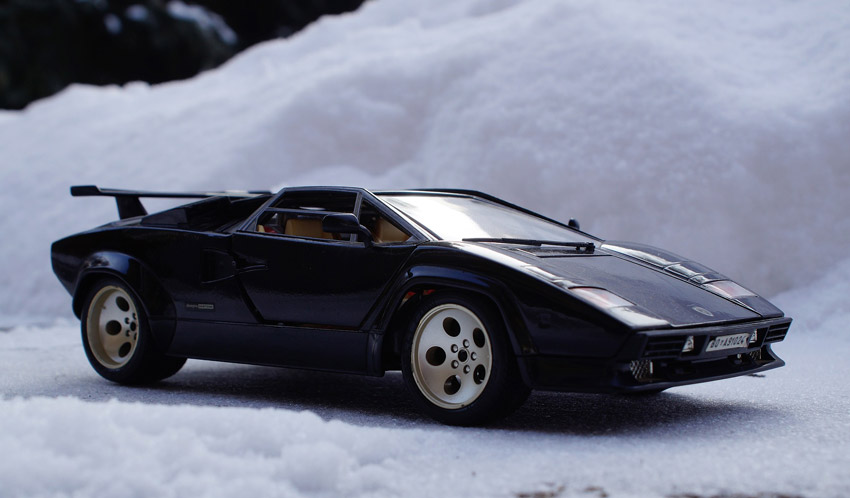
This image is created & displayed the most common way, sizing it down to the desired width in Photoshop and displaying as is.
But as I say, there’s a way to make it download faster without sacrificing quality! Instead of sizing it down to the size we actually need, we’re going to size it down just a little bit. Instead of 850 x 498, we’re going to size it down to 1700 x 997. But when we do our Save For Web & Devices, instead of a quality level of 70, we’re going to use a quality level of 0.
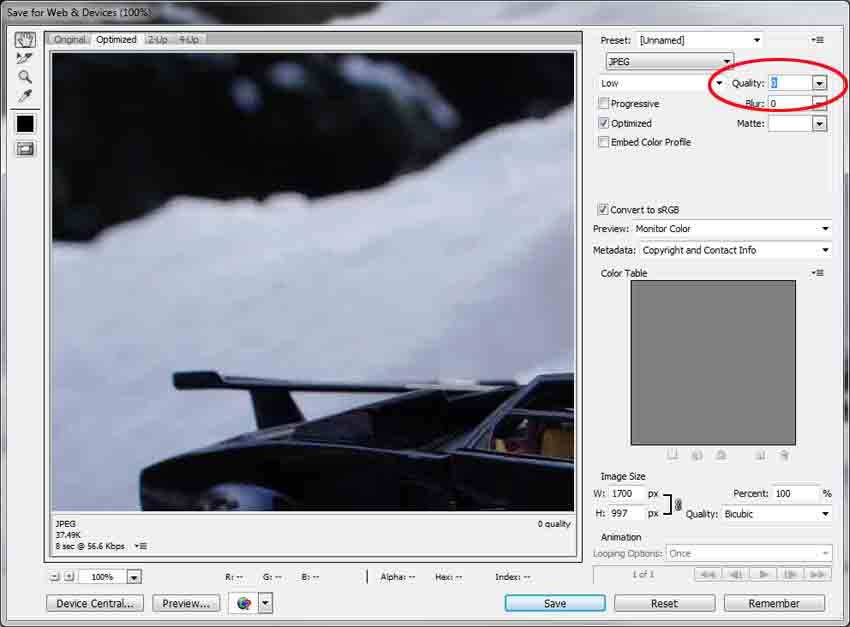
An alternative method is to only reduce the dimensions so that they are twice as big as you need the image (don’t enlarge the original image!) and save with a quality level of 0.
I know what you’re thinking, “Saving with a quality of 0 will make it look awful!” And if we were going to display it as is, you’d be right. But remember, we want it to display at 850 pixels wide. And we’re going to let the browser do the scaling down by adding an attribute of width=’850′ to the <img> tag. So instead of this:
&amp;amp;lt;img src='images/lamborghini2.jpg'&amp;amp;gt;
We use this:
&amp;amp;lt;img src='images/lamborghini2.jpg’ width='850'&amp;amp;gt;
That causes the browser to scale it down and it now looks like this:

Go back and look at how that compares to the traditional version above. It looks pretty good, right? Dare I say, even better? And the file size of this image is only 38.6 Kb, barely half the size of the first version. Daan Jobsis found this to be the case over and over, with a wide range of different kinds of images: better display quality at around half the file size.
What Are The Best Ways To Use This?
So obviously, there are some things to keep in mind in order to use this technique effectively. First and foremost, you must have a source image at least twice as big as the size you want it to render on your page. You can’t take a 850 pixel image and then try to “grow” it to 1700 wide. If you tried that, the resulting image really would be ugly. You need to start with an image sufficiently larger than the display area you’ll want.
And secondly, you obviously don’t need to do this to every single image on every page of your site. Icons, thumbnails, and other small images won’t benefit from as much savings, and probably aren’t worth the effort that is required. But for your larger, more colorful images, this is a simple method to offer significant reductions to the size of your largest files on a page.
Reduce Those Large Images
So now you are armed with yet another technique to go and take some of those giant images haunting your site and slowing it to a crawl, and make them much smaller (without sacrificing quality). Go start updating some of your most popular pages and share with us in the comments the results they had for you!